
Project Case Study
Tub Surround, Vanity, and Bathroom Remodel in Tyler, TX
Pioneer Construction completed a multi-part bathroom remodel in Tyler, TX. The project included selective demolition, a new white bathtub with a tiled tub-and-shower surround, two recessed storage niches, grab bars, a white vanity, a veined countertop, updated lighting, and fresh wall paint.
Project Snapshot
A focused, multi-part bathroom update in Tyler
The project connected the bathtub area, vanity, countertop, lighting, and painted walls while leaving retained room elements outside the work described here.
Project Type
Tub-surround, vanity, and bathroom remodel
Location
Tyler, TX
Demolition Scope
Selective removal of the previous bathtub, surround, and related bathroom finishes
Tub and Surround
New white bathtub with large rectangular brown-and-taupe wall tile
Built-In Storage
Recessed soap and storage niches
Stability Features
Grab bars included in the tub-shower scope
Vanity and Countertop
White vanity with a light veined countertop and integrated rectangular sink
Lighting and Paint
Updated bathroom lighting and fresh neutral wall paint
Project Sequence
From the original room through the finished tub surround
These five distinct photographs document the original bathroom, selective demolition, new-tub preparation, tile installation, and the finished tiled surround with two recessed niches.
Project Overview
Coordinating the tub surround, vanity, lighting, and paint
This Tyler project was a focused bathroom renovation with several connected parts. Pioneer completed selective demolition, removed the previous bathtub and surrounding finishes, installed a new white bathtub and tiled tub-and-shower surround, added recessed niche storage and grab bars, replaced the vanity and countertop, updated the bathroom lighting, and painted the walls.
The work was broader than a single-fixture replacement, while selected room elements remained in place. Keeping that distinction clear matters: the toilet, mirror, door, ceiling, exhaust fan, and other retained elements visible during the project are not presented as replacements.
Homeowners planning a similar project can review Pioneer's bathroom remodeling services and the local Tyler bathroom remodeling guide. Other completed work is collected on the case-studies hub.
Before and Demolition
The original bathroom and targeted removal
The before photograph records a compact bathroom with an existing bathtub, small square tub-surround tile, vanity and countertop, mirror, vanity lighting, and floor. Together, those elements show the working clearances between the tub, toilet, vanity, and doorway.
Pioneer's selective demolition removed the previous bathtub and surrounding wall finishes and opened the portions of the tub-area walls needed for the planned work. The progress view shows that the demolition was targeted: the toilet and vanity remained in the room at that stage. Exposed framing documents access during construction; it does not show repair work or other concealed conditions.
Bathtub and Surround
A new white bathtub with a high tiled surround
The replacement bathtub is a white rectangular tub. A preparation photograph shows it in place while the surrounding walls were still in progress. Wall backing and tub-surround preparation were underway before tile, but the image does not identify a product or document the complete wall system.
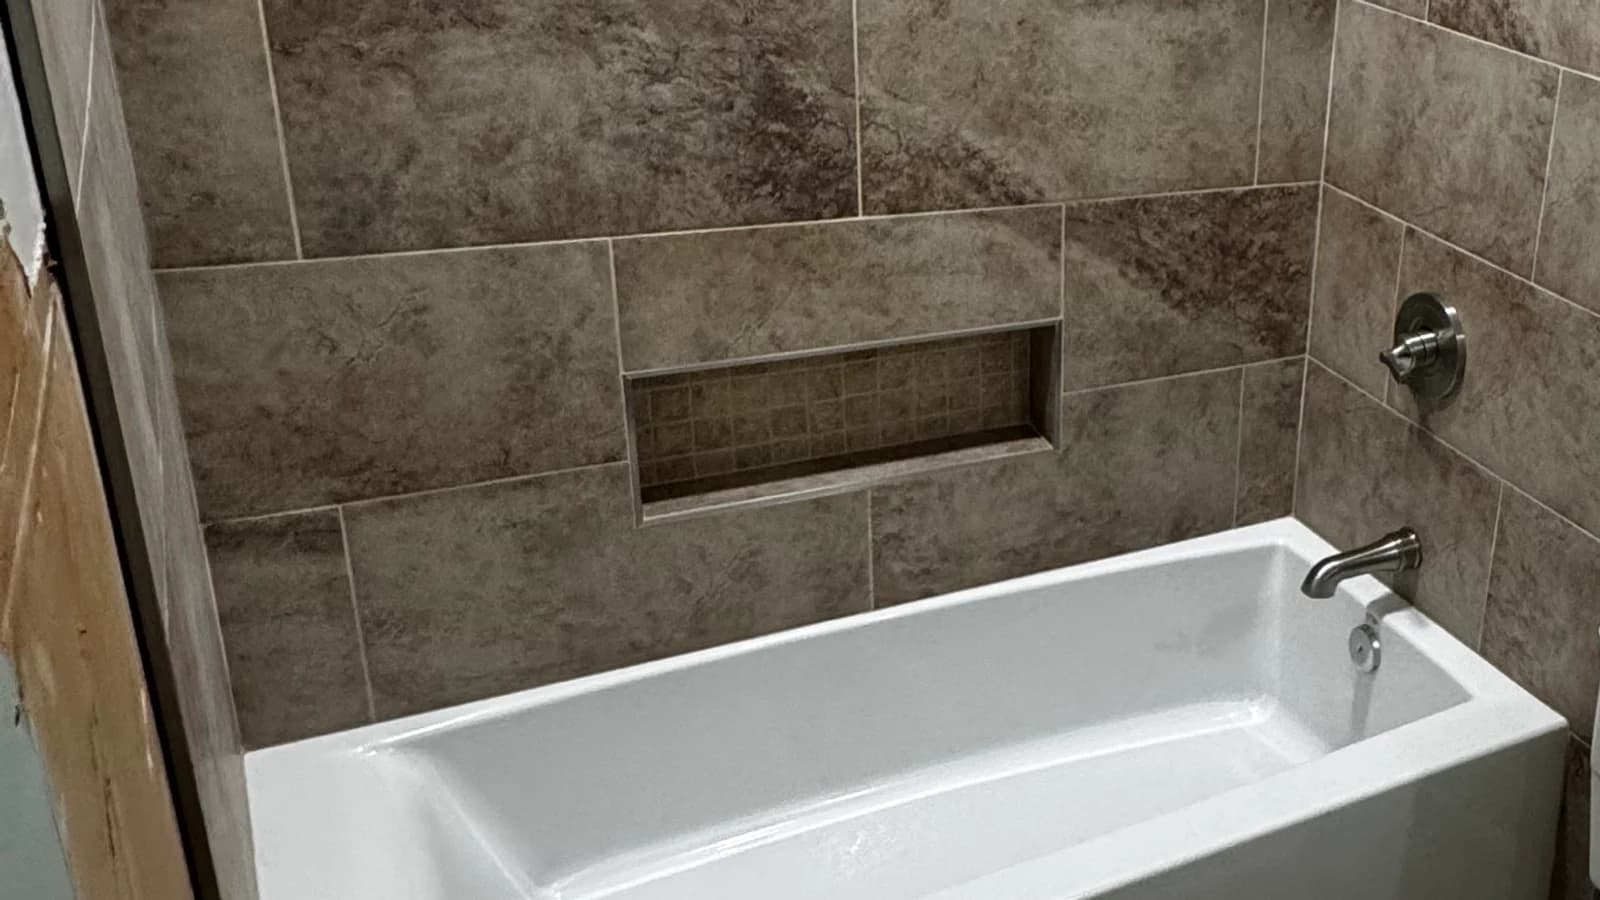
In the finished surround, large rectangular brown, taupe, and gray wall tile runs high around the bathtub in a horizontal staggered layout. The repeated horizontal joints and varied tones coordinate the three tub walls while the white bathtub provides a clear contrast at the lower edge. A separate Flint bathtub replacement case study shows how a more limited tub-area scope can be defined.
For a future replacement, tub planning should account for opening dimensions, drain compatibility, fixture locations, wall clearances, removal and installation access, and the transitions at the finished floor. Surround planning adds starting lines, tile layout, corner cuts, fixture penetrations, ceiling and tub-edge transitions, niche alignment, and edge treatment. These planning considerations vary by home and should be confirmed against the selected materials and existing conditions.
Storage and Stability
Two recessed niches and grab bars in the tub-shower scope
Two separate recessed storage niches are clearly visible in the completed surround. Both are rectangular, and their smaller-format interior tile distinguishes the openings from the larger surrounding wall tile. The photographs show the two finished storage openings; their dimensions and concealed construction are not documented.
Grab bars were incorporated into the tub-and-shower scope. Their exact number, finish, dimensions, mounting method, and rating are not specified here. In general, proposed grab-bar locations and wall-support needs should be settled before finished wall surfaces are completed. This case study does not assign a compliance status or a fall-prevention guarantee.
Vanity and Countertop
A white vanity with a light veined countertop
Pioneer installed a new white vanity and a light countertop with brown and gray veining. An integrated rectangular sink completes the vanity update. The countertop is described by its visible color and veining without assigning a material, manufacturer, or product line.
Vanity selection in a compact room should account for cabinet and countertop width, sink position, plumbing alignment, door swing, toilet clearance, and the walking path. Mirror and vanity-light placement also need to be coordinated with the finished counter height and sink center. Those measurements help define the replacement without assuming that a nearby toilet or retained mirror is also part of the scope.
Lighting and Paint
Updated illumination and neutral painted walls
The completed bathroom includes a three-light vanity fixture and recessed ceiling lighting near the tub area. These visible fixtures support both mirror-area and overhead illumination. The project included bathroom lighting updates without assigning details to concealed electrical work or fixture performance.
Fresh neutral wall paint completed the visible transition between the remodeled areas and retained room surfaces. For planning purposes, homeowners should confirm vanity illumination, mirror placement, overhead-light positions, moisture-zone requirements, existing electrical conditions, and the exact walls included in painting. This project's painting applied to the bathroom walls.
Finished Result
A coordinated tub-surround and vanity remodel
The finished Tyler bathroom brings together the new white bathtub, brown-and-taupe tiled surround, two recessed storage niches, grab bars, white vanity, light veined countertop with an integrated rectangular sink, updated lighting, and neutral painted walls. Together, those elements make up the focused, multi-part remodel while retained room components remain outside the work described here.
Homeowners deciding between a retained tub and another layout can use the walk-in shower versus tub-shower guide. More project photography is available in Pioneer's remodeling gallery.
Homeowner Planning
What to plan before a tub-surround and vanity remodel
Use this general checklist to align demolition, measurements, retained fixtures, finish selections, and estimate boundaries before work begins.
- Define whether the work is a focused bathroom update or a broader room remodel so every proposal covers the same areas.
- Confirm which bathtub, surround, vanity, wall, and other finishes are included in selective demolition.
- Measure the replacement-tub opening, wall clearances, access path, and nearby door swing before ordering the tub.
- Confirm drain compatibility and fixture locations for the selected bathtub without assuming that plumbing will be relocated.
- Choose the tub-surround tile, layout direction, grout approach, edge treatment, and transition points together.
- Plan niche size, position, and alignment with the tile layout before the finished wall surfaces are installed.
- Choose grab-bar locations early so the wall-support requirements can be addressed before finish work.
- Check vanity width against the door, toilet, walking path, and available wall space.
- Coordinate countertop width, sink position, and plumbing alignment with the selected vanity.
- Plan the mirror and vanity-light positions as one elevation so the fixture is centered where intended.
- Confirm whether recessed ceiling lighting is part of the estimate and how existing electrical conditions affect the plan.
- List which walls are being painted and which ceiling or retained surfaces are outside the paint scope.
- Confirm in writing whether bathroom flooring is included instead of relying on room photographs or assumptions.
- Identify the toilet, mirror, door, exhaust fan, and other existing elements that will remain.
- Order enough tile for the approved layout and consider keeping matching pieces for possible future repairs.
A written scope should make it easy to see what will be removed, what will be installed, which existing fixtures will remain, and whether flooring or another connected surface is included. That shared list gives the homeowner and remodeler a clearer basis for selections, scheduling, and the in-home estimate.