
Project Type
Curbless custom shower, plumbing, and bathroom-floor remodel
Project Case Study
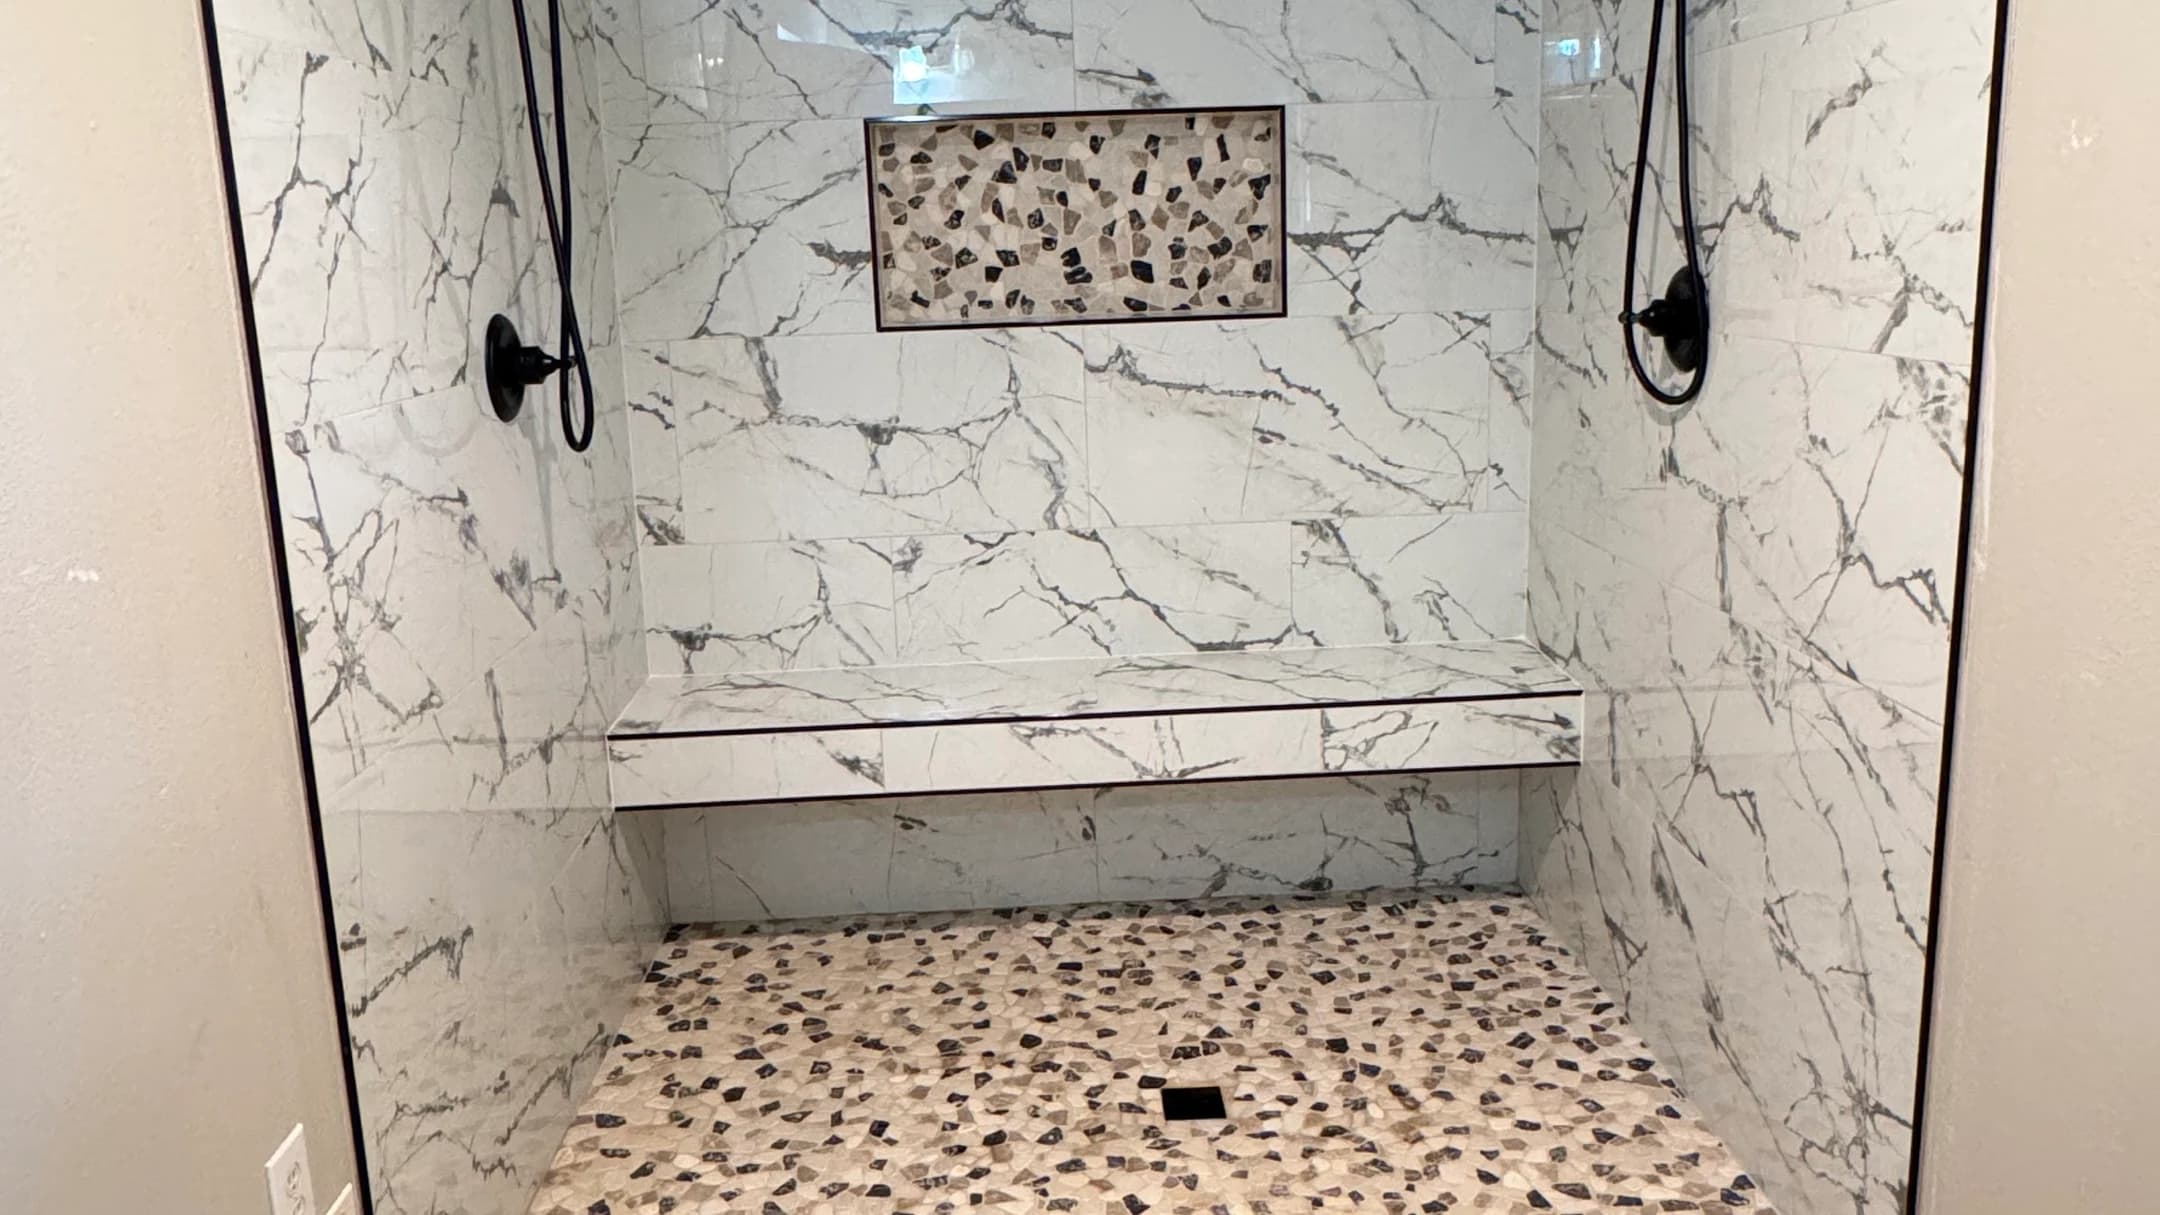
Pioneer Construction completed a curbless custom shower and bathroom-floor remodel on a concrete slab in Marshall, TX. The project included the shower plumbing, two black shower systems, large white-and-gray veined wall tile, a mixed-tone mosaic shower floor, a full-width tiled bench, a recessed mosaic niche, and light bathroom-floor tile.
Project Snapshot
The completed Marshall project brings the shower plumbing, tiled shower, built-in features, curbless entry, and bathroom-floor tile into one focused scope.
Project Type
Curbless custom shower, plumbing, and bathroom-floor remodel
Location
Marshall, TX
Foundation
Bathroom constructed on a concrete slab
Shower Entry
Curbless transition between the bathroom floor and shower floor
Wall Finish
Large white tile with gray veining
Shower Floor
Mixed-tone irregular mosaic with a black square drain
Built-In Features
Full-width tiled bench and recessed soap niche
Shower Plumbing and Fixtures
Two black shower systems with fixed heads and handheld wands
Bathroom Flooring
Light rectangular floor tile with gray and beige veining
Project Overview
Pioneer Construction completed the curbless custom shower, shower plumbing, shower-wall and shower-floor tile, full-width tiled bench, recessed soap niche, and bathroom flooring for this Marshall project. The bathroom is constructed on a concrete slab, and the finished entry joins the bathroom-floor tile to the shower mosaic without a raised shower curb.
The project is documented as a shower-and-floor remodel rather than a complete bathroom remodel. The vanity, toilet, mirror, window, walls, door, and baseboards remain visible in the completed photographs, but they are not presented as work completed by Pioneer. The available images show the finished project only; there is no before or construction sequence.
Homeowners considering a similar focused scope can review Pioneer's custom shower services, compare the connection to broader bathroom remodeling services, and confirm current coverage on the service areas page.
Curbless Shower on a Slab
The Marshall bathroom is on a concrete slab, and Pioneer completed a curbless shower as part of the concrete-slab bathroom project. In the finished room, the mixed-tone mosaic shower floor meets the light rectangular bathroom-floor tile without a raised curb. Floor elevations, drainage, and the entry had to be coordinated for that curbless design.
For homeowners planning a similar project over a concrete slab, general design work should consider the finished floor elevation, tile thickness, shower-pan slope, drain location, waterproofing, water containment, and the transition to the surrounding bathroom floor. Those items affect one another and should be evaluated before finish materials are ordered.
A future bathroom may or may not require slab modification; that cannot be determined from the finished appearance alone. The actual room and proposed layout need to be evaluated before the scope is defined. The curbless shower planning guide and tile-shower water-management guide offer additional general planning context.
Shower Plumbing
Shower plumbing was part of Pioneer's scope. The completed shower has two black shower systems, one mounted on each side of the wide shower. Each visible system includes a fixed shower head and a handheld wand, creating a balanced fixture layout across the wide shower.
In a similar project, fixture height, control location, handheld-hose movement, user reach, bench placement, and niche placement should be coordinated before tile installation. Planning those relationships early helps keep fixture penetrations and storage aligned with the wall layout instead of treating the plumbing as a separate finish decision.
Appearance alone does not identify concealed plumbing routes, valve types, flow rates, or how multiple fixtures operate. Homeowners should review those details from the selected product documentation and the project's plumbing scope.
Veined Wall Tile
Large rectangular white tile with gray veining covers the shower walls, the bench, and the visible face around the opening. Dark edge trim outlines the shower opening, recessed niche, and bench edges, while the broad light surfaces keep the gray veining easy to see across the room.
Large-format veined wall tile requires deliberate planning around wall preparation, layout lines, vein distribution, corners, fixture penetrations, bench edges, niche alignment, and cuts at the ceiling and shower floor. The exact material and product should be confirmed from documentation rather than inferred from its appearance.
Mosaic Shower Floor
Mixed-tone irregular mosaic tile covers the shower floor, and a black square drain sits within the field. The same mix of light, beige, gray, and dark pieces appears inside the recessed niche, connecting the storage accent to the shower floor.
Small-format mosaic can accommodate the changing planes of a shower floor more readily than large tile. For another project, the selected mosaic, shower-floor planes, perimeter cuts, drain position, waterproofing, and cleaning expectations should be reviewed together. Product documentation should establish the mosaic material and performance characteristics.
Recessed Storage
A recessed soap niche is centered on the back wall above the bench. Its matching mixed-tone mosaic accent and dark edge trim create a compact visual link to the shower floor while providing built-in storage for shower products.
For a future shower, niche placement should be planned around the wall tile layout, product storage, fixture locations, and the nearby bench. The finished dimensions and concealed construction depend on the actual wall and selected shower system.
Built-In Bench
The built-in tiled shower bench extends from wall to wall across the back of the shower. Veined tile continues over its top and face, and dark trim defines the front edges against the surrounding wall tile.
Bench placement, tile courses, water-management details, fixture reach, and niche location should be planned together. Those decisions depend on the room and intended use; the finished photograph does not establish a concealed framing method or weight capacity.
Bathroom Flooring
Pioneer installed the light rectangular bathroom-floor tile outside the shower. Its subtle gray and beige veining carries a quieter pattern through the room, then meets the smaller mixed-tone mosaic at the curbless shower entry.
The transition is a functional and visual meeting point between two tile formats. Layout planning should account for tile thickness, cut placement, room edges, the shower opening, and any fixtures or room elements that will remain. The stone-look pattern describes the visible appearance; the exact flooring material should be confirmed from the selected product information.
Coordinated Materials
The finished materials share a limited palette without making every surface identical. White-and-gray veined shower tile creates the broad backdrop; mixed-tone mosaic adds a smaller pattern at the shower floor and niche; dark trim outlines the tiled edges; and the two black shower systems relate to the black square drain. Light bathroom-floor tile carries the neutral colors beyond the curbless entry.
Homeowners can compare more finish combinations in Pioneer's project gallery before discussing the materials and exact scope for their own room.
Homeowner Planning
Start with the exact shower, plumbing, and bathroom-floor scope, then coordinate elevations, drainage, fixtures, built-in features, tile layouts, transitions, and retained room elements before work begins.
A clear estimate separates the work being changed from the room elements that will remain. Bring product preferences, reference photos, and practical priorities to the walkthrough, then confirm the actual scope and feasibility for the concrete-slab room.
Completed Project
These completed-project photographs show the custom shower and the curbless transition between the mixed-tone mosaic shower floor and the light bathroom-floor tile.
Share the current bathroom, concrete slab, shower features, plumbing needs, bathroom-floor scope, and project location. Pioneer Construction can review the actual room before preparing an estimate.