
Project Type
Custom shower and bathroom-floor remodel
Project Case Study
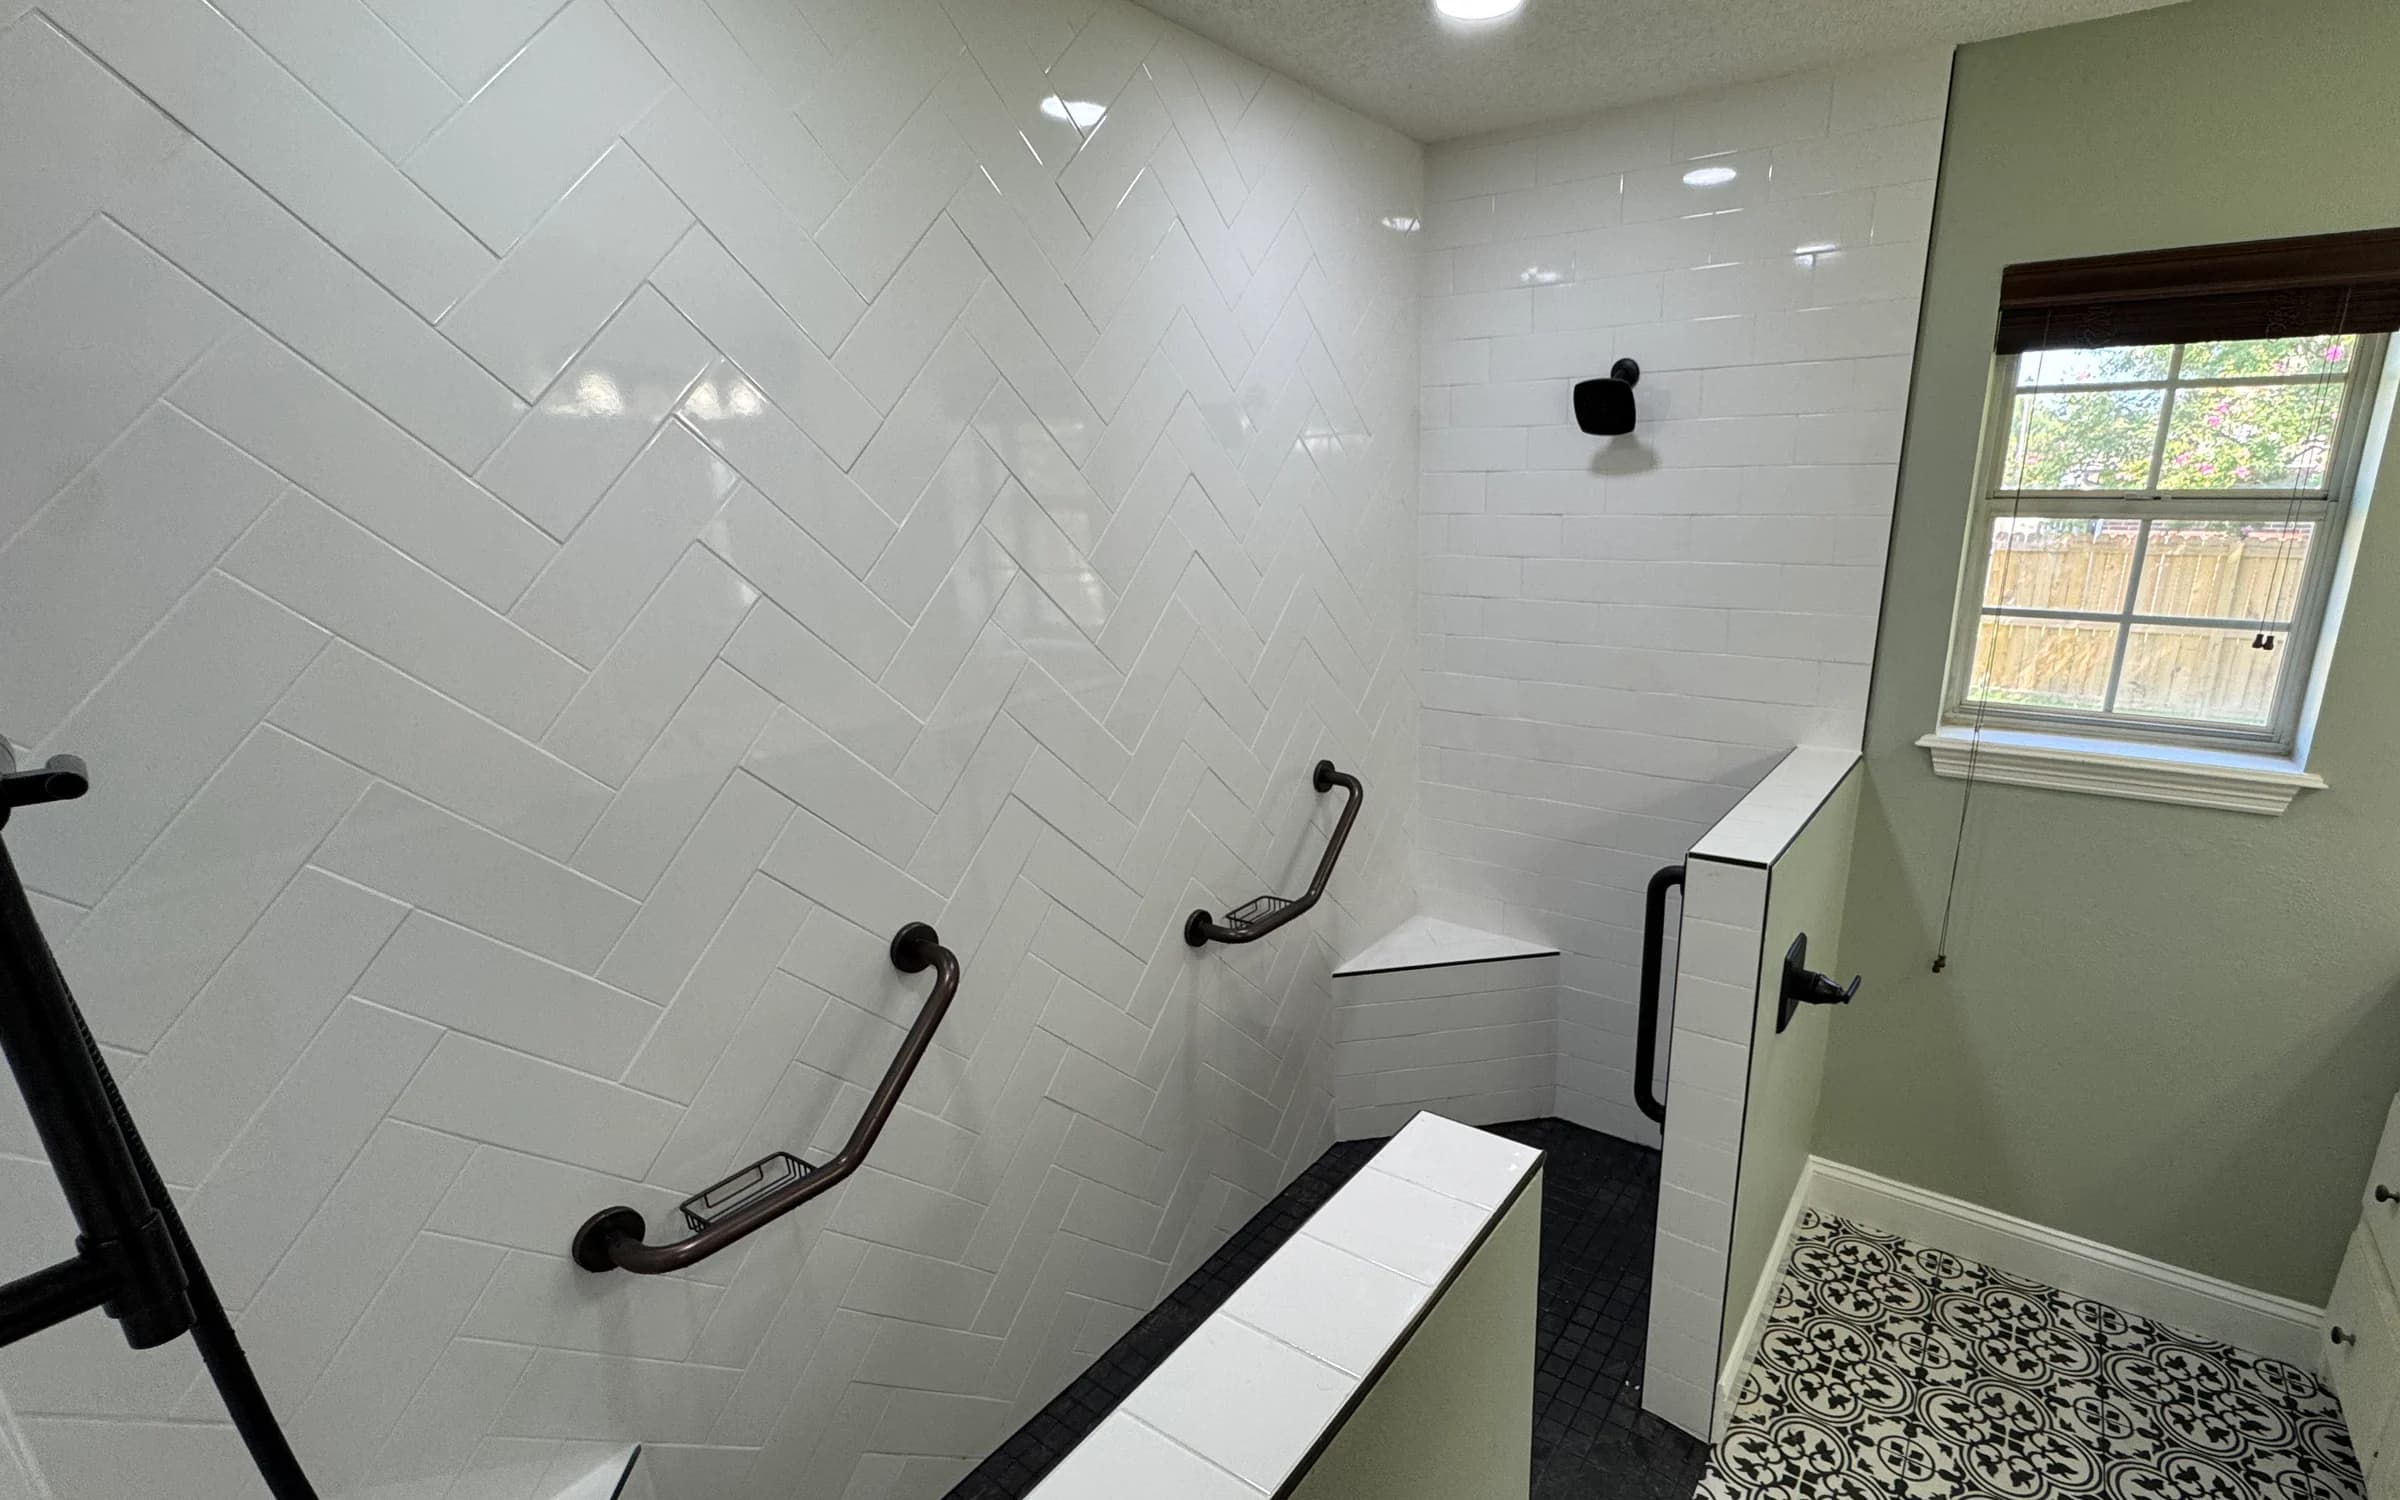
Pioneer Construction completed a custom shower and bathroom-floor remodel in Whitehouse, TX. The finished project features an open-entry tiled shower with a herringbone feature wall, dark mosaic shower floor, multiple grab bars, tiled corner ledges, a recessed niche, fixed and handheld shower fixtures, and coordinated black-and-white patterned flooring through the bathroom.
Project Snapshot
The completed scope joins an open-entry tiled shower with patterned flooring across the visible bathroom areas.
Project Type
Custom shower and bathroom-floor remodel
Location
Whitehouse, TX
Shower Layout
Open-entry shower with two tiled pony walls
Wall Design
White rectangular tile with a herringbone feature wall and horizontal adjoining walls
Shower Floor
Dark small-format square mosaic tile
Built-In Features
Recessed pony-wall niche and two tiled corner ledges
Fixtures and Grab Bars
Fixed shower head, handheld shower system, and multiple dark-finish grab bars
Bathroom Flooring
Black-and-white patterned flooring through the main room and toilet alcove
Completed Project
These completed-project photographs show the finished tiled shower, herringbone feature wall, mosaic shower floor, grab bars, corner ledges, recessed niche, shower fixtures, and patterned bathroom flooring.
Project Overview
Pioneer Construction completed this Whitehouse project around two coordinated areas: a custom tiled shower and black-and-white patterned bathroom flooring. The shower uses light and dark finishes to define the bathing area, while the floor pattern carries a coordinated graphic element through the main room and toilet alcove.
These completed-project photographs show the finished shower and bathroom flooring rather than a before-and-after or construction sequence. The page focuses on those two areas; the surrounding vanity, mirror, window, lighting, paint, cabinets, doors, and toilet are not presented as part of Pioneer's work.
Homeowners can compare this focused scope with Pioneer's broader bathroom remodeling services and confirm current coverage on the service areas page.
Open-Entry Layout
The completed walk-in shower has an open entry framed by two tiled pony walls. Their placement creates a clear transition from the patterned bathroom floor to the dark shower mosaic while keeping the main shower wall visible from the room. One pony wall also holds the recessed niche.
Pony-wall dimensions and locations can affect entry width, sightlines, water containment, grab-bar placement, storage, and how a homeowner may approach a future glass decision. Those relationships should be planned together instead of treating each wall as an isolated finish detail.
Entry height, shower-floor slope, drain location, and water management also need to be confirmed for the actual room before work begins. The tile-shower water-management guide explains why the finished tile is only one part of shower planning.
Wall Design
White rectangular wall tile runs across the shower, with the primary wall arranged in a herringbone pattern. The adjoining surfaces use a horizontal running-bond layout, creating a visible change in direction while keeping the same light tile color throughout the enclosure.
Herringbone layouts depend on deliberate center lines, consistent angles, corner cuts, and pattern alignment. Fixture penetrations and the transitions to horizontal courses also need to be considered before the first rows are set. Dark edge trim outlines exposed tile boundaries and gives the pony walls, niche, and ledges a consistent finish line.
Homeowners planning a similar look should compare samples and product documentation before choosing the tile. Shape and color alone do not establish the material, brand, or product line.
Shower Floor
Dark square mosaic shower tile covers the shower floor and contrasts with the white wall tile. The smaller pieces create many joints and can follow the changing planes of a shower pan more readily than a large tile format.
For a future project, the mosaic selection, drain position, floor planes, perimeter cuts, and cleaning expectations should be reviewed as one system. Confirm the mosaic material and performance details from product documentation, then coordinate the water-management system and floor slope for the actual room.
Grab Bars and Ledges
Multiple dark-finish grab bars are visible across the shower walls, and two triangular tiled corner ledges sit inside the shower. The dark metal finish connects visually with the shower fixtures, edge trim, and mosaic floor without making the lighter wall pattern feel crowded.
Grab-bar locations and structural support should be planned before the walls are finished so the intended handholds can be coordinated with the entry, controls, fixture reach, and tile layout. Because load and placement requirements vary, confirm the intended standard for the actual household and project before the walls are closed.
Fixtures and Storage
The shower includes a black fixed shower head and a black handheld shower system mounted on a slide bar. The handheld hose, controls, grab bars, corner ledges, and pony walls share a compact area, so their positions need to work together without creating awkward reach or hose movement.
A recessed storage niche is built into one tiled pony wall. Built-in storage gives bottles and everyday products a defined location away from the shower floor and reduces reliance on hanging organizers. Its dimensions should be coordinated with the tile layout and the products homeowners plan to store.
Homeowners comparing fixture arrangements and storage options can review more completed work in Pioneer's project gallery or discuss the actual room during an estimate visit.
Bathroom Flooring
Black-and-white patterned bathroom flooring continues through the main room and into the toilet alcove. Its repeating motif introduces a larger scale pattern beside the finer dark square mosaic inside the shower.
Patterned floors require layout planning around room center lines, doorways, vanity edges, toilet penetrations, shower transitions, and perimeter cuts. A layout can look different depending on where the repeat begins, which motif is centered, and how partial shapes meet the room edges.
Homeowners considering a similar pattern should compare samples and product documentation before choosing a product. Material, finish, maintenance, and manufacturer specifications need to suit the way the room will be used.
Coordinated Finishes
The completed room uses contrast rather than matching every surface. White shower tile keeps the wall layouts easy to read, while the dark shower floor, dark edge trim, black fixtures, and dark-finish grab bars define the shower details. The patterned bathroom floor then carries the black-and-white palette beyond the pony walls.
Coordinating these choices early helps the shower and bathroom floor read as parts of one plan while allowing the herringbone wall and floor pattern to keep their separate roles.
Homeowner Planning
Start with the exact rooms and surfaces included, then coordinate layout, fixtures, support, storage, drainage, patterns, and transitions before ordering finish materials.
A shower-and-floor estimate is clearer when retained room elements are listed alongside the work that will change. Bring product preferences, reference photos, and practical household priorities to the initial conversation, then confirm feasibility and scope in the actual room.
Share the existing bathroom, the shower features and floor pattern you want to discuss, and the project location. Pioneer Construction can review the actual space before preparing an estimate.